Your Cart is empty.
Your Guide to Setting Up the Carbon Waterfed Poles Kit
Product Components

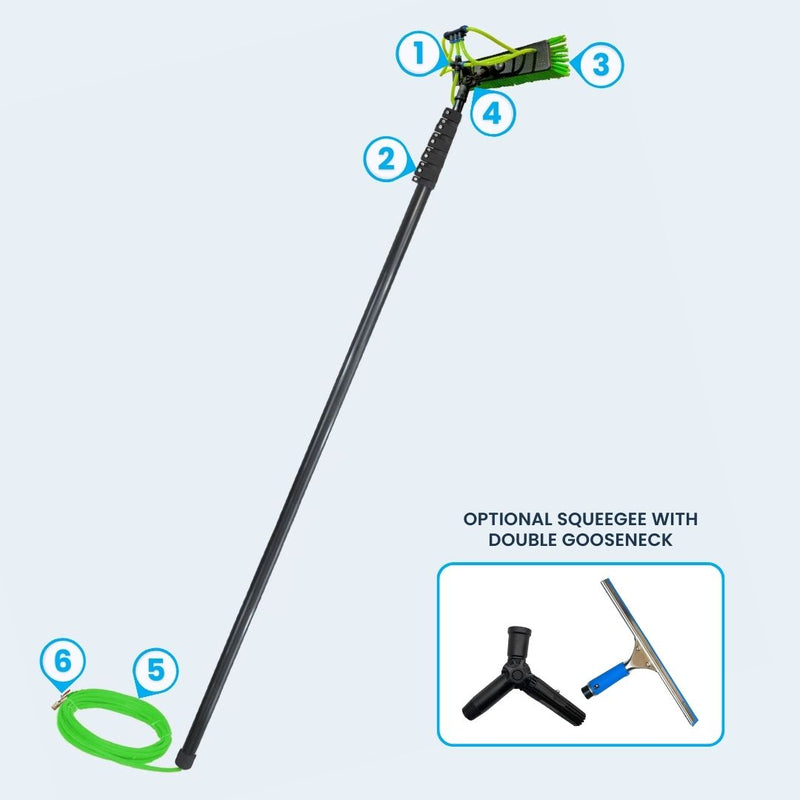
4 Port Push Fit Connector: Features four port enabling users to easily attach multiple hoses and ensures a secure, leak-proof connection.
Adjustment Clamps: Allows for easy adjustment and secure locking of the pole's length.
Brush Head: The 13" Dual Trim Brush equipped with 6 nozzles designed to enhance cleaning efficiency and coverage.
Gooseneck: Adjusts to any angle for hard-to-reach areas. Made with durable heavy duty plastic.
Hose: Designed for maintaining optimal water flow from the source to the pole's brush head.
Shut-off Valve:This valve allows operators to quickly start or stop the water from the water source.
How To Assemble
-

STEP 1
Attach the female coupling to the brass male shut off valve.
-

STEP 2
Rotate the red handle of the brass valve to the side to close and push back to open.
-

STEP 3
The brush will arrive with the hoses pre-attached to the barbed nozzles. All you will need to do is attach the connectors.
-

STEP 4
Then, insert the gooseneck or angle adapter onto the brush head.
-

STEP 5
Adjust the gooseneck to your desired angle by loosening and tightening the star nut on the side of the gooseneck or angle adaptor.
-

STEP 6
Insert the green hose into the carbon pole connector.
-

STEP 7
Adjust the hex screws of the carbon pole connector by using the hex key to tighten and loosen the connector.
-

STEP 8
After adjusting the carbon pole connector, insert the hose into the connector tip.
-

STEP 9
Use the hex key to pry the hose out of the connector tip.
-

STEP 10
Attach the gooseneck or angle adapter to the connector tip.
-

STEP 11
Get the brush head and attach it to the gooseneck.
-

STEP 12
Insert the green hose to the connector by pressing the blue locking collar.
-

STEP 13
Adjust the gooseneck by hand tightening the star nut to place the brush to your desired angle.
-

STEP 14
To extend the pole, unclamp the black pole clamp (closest to the bottom of the pole).
-

STEP 15
Extend each sections one by one and lock the clamp.
-

STEP 16
The locking clamp can be adjusted using the hex key to loosen and tighten the hexagon screws, to retract or extend the pole.
ATTACHING THE BRUSH HEAD AND OPTIONAL SQUEEGEE
-

STEP 1
If you ordered the hose and optional squeegee, you will receive a double gooseneck adaptor and screw on connector.
-

STEP 2
Screw the brush head onto the double gooseneck
-

STEP 3
Connect the hose to the 4 port connector
-

STEP 4
Screw the squeegee connector onto the gooseneck and slide the squeegee onto the connector, lining the hole with the button to hold the squeegee in place.
DO'S AND DONT'S
-

Attaching the hose onto the 4 port connector
When attaching the hose to the connector you must pull back the blue locking collar and insert the hose.
-

It's important to not overextend your pole
There will be a red visual warning area at the top of each pole section that helps you to prevent overextending the pole.
-

Pulling the hose from the bottom of the pole
When retracting the pole, it is important to gently pull the hose from the bottom to prevent it from bunching up and getting caught inside the pole, it is helpful to have two people.


